> Knowledgebase > Beginner guides > Viewing Article
How to host a website on Linux VPS (Centos 7 OS)
A success story of total beginner, annotated by an experienced Linux administrator
We post this article sent to us without any edits. However one of our Senior Engineers provided their comments where necessary. We feel that this article may be of value to those of our customers who take their very first steps towards building a website on a Linux VPS.About the author:
What I like about Linux? – The penguin :)
What I know about Linux? – Zero
What I need from Linux? – To host my website on Linux VPS
Navigation:
Step 1-7 buying VPS
Step 8-13 setting up VPS
Step 14-16 copying website files etc
(Skip to Step #8 to start "talking" to your VPS via Linux to set up a website).
1. Buying my first VPS
Ordered here: https://bandwagonhost.com/cart.php
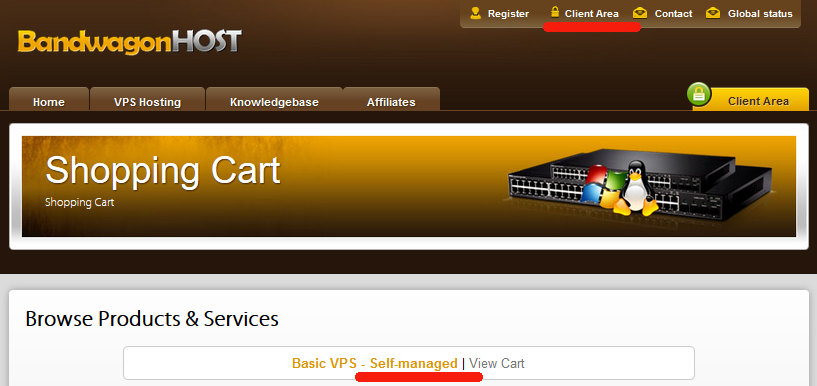
It's a self-managed VPS. Acknowledged. Let’s do it!
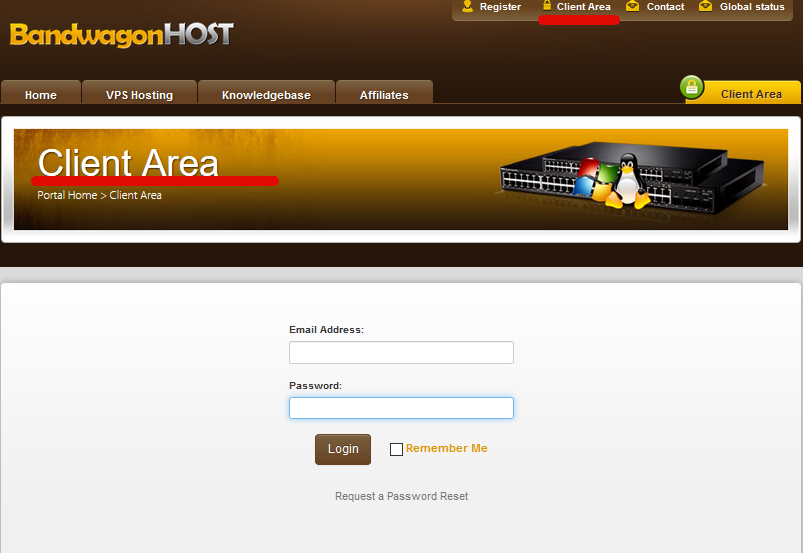
2. Log into my Client Area
If successful, skip to Step #3. If struggling, go to Contact page and ask for help.
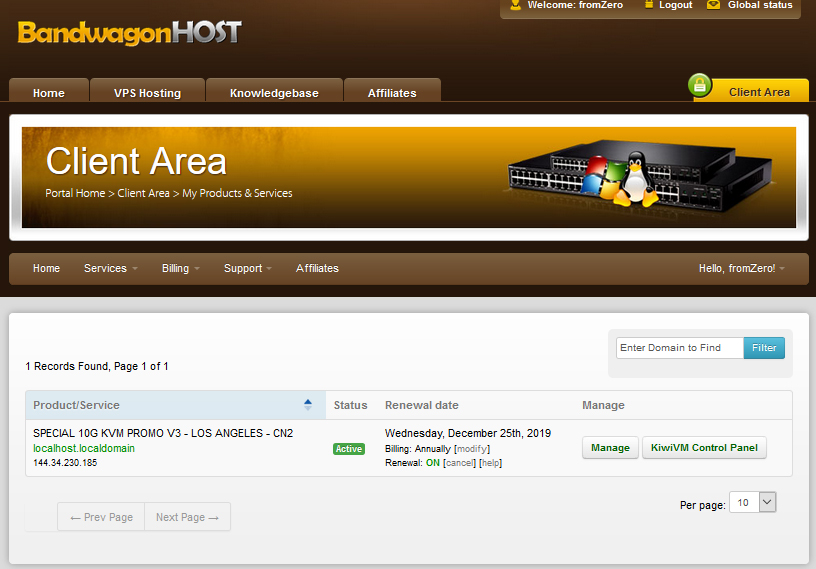
3. Client Area Navigation
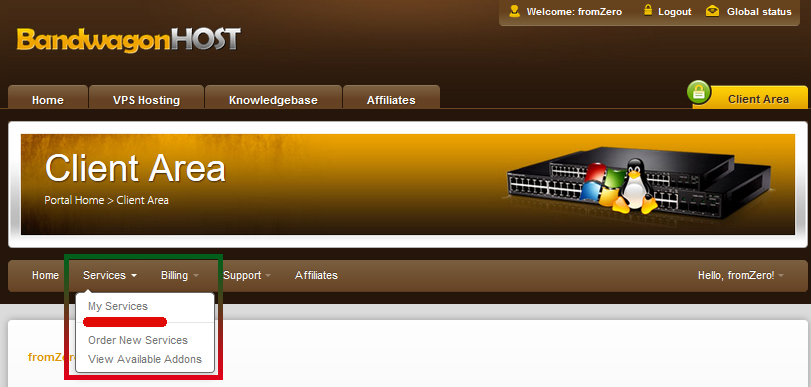
Go to tab "Services" -> "My services" It shows the list of all VPS in the account.

Can’t wait to see my new VPS in action... Click "KiwiVM Control Panel" button to go to your VPS Control Panel.
4. KiwiVM Control Panel first look
OK, how to build my website here? Just browsing through menus, very little clue about any of this VPS stuff :)
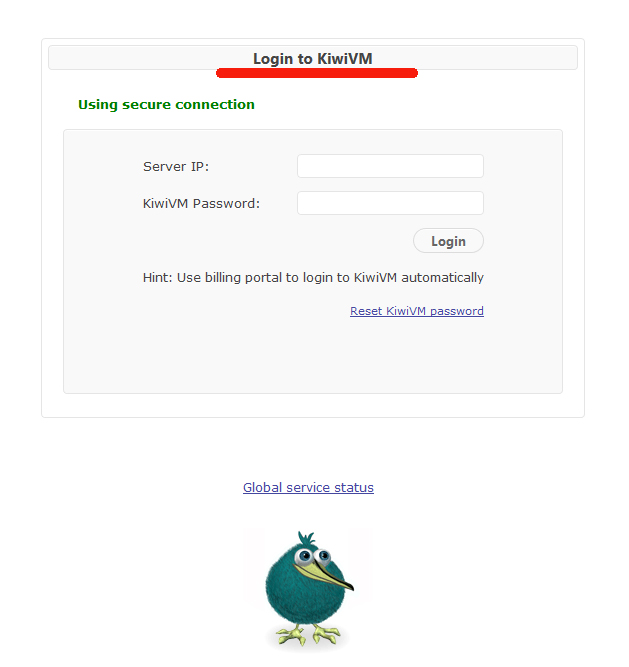
5. KiwiVM Control Panel Log in and Password
Important first step: Change your KiwiVM Control Panel password (before you Log off)

If you just like me logged off mindlessly, you’re now seeing this:
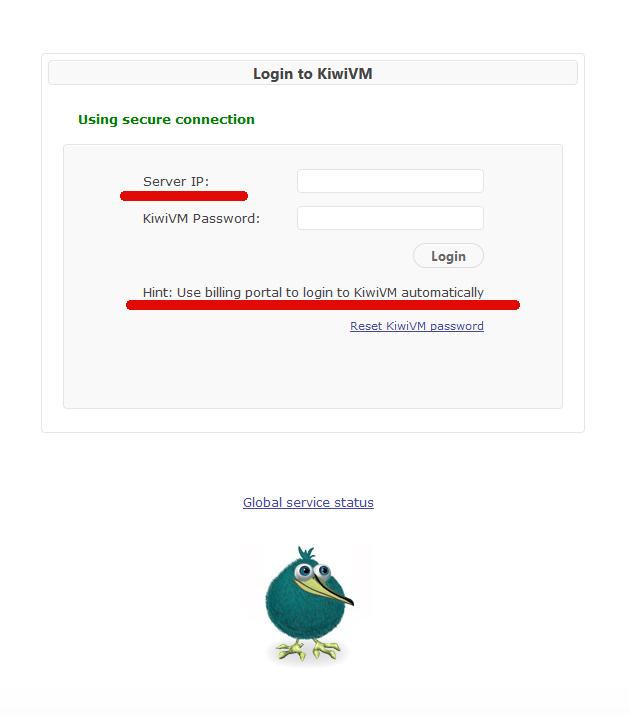
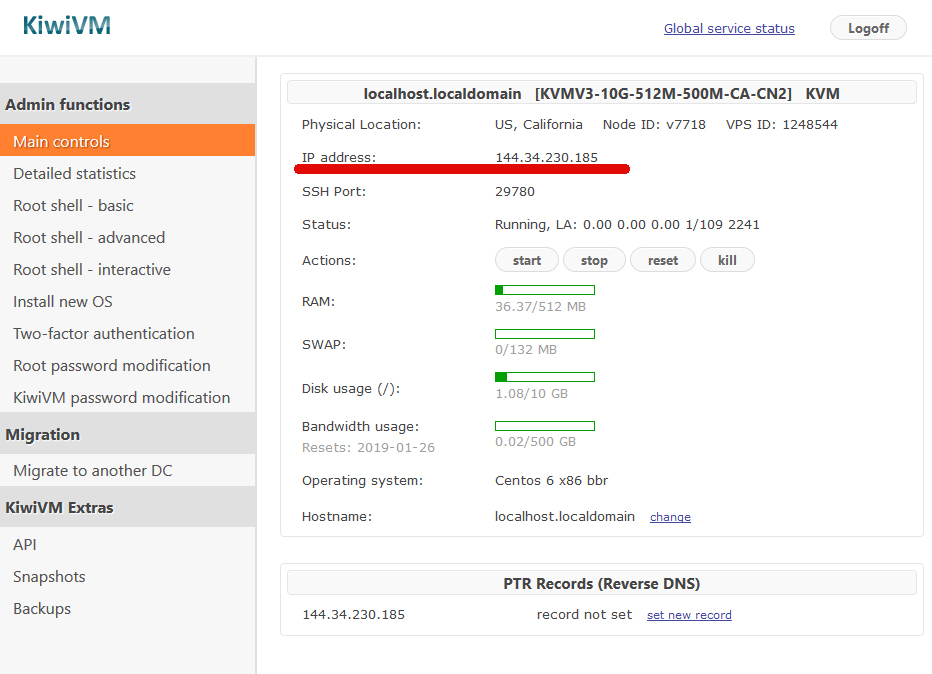
Passwords and more passwords... Anyway, where do I get the Server IP now?
Answer: go back to Client area (Step #2) or quick link: https://bandwagonhost.com/clientarea.php
Here is IP address:
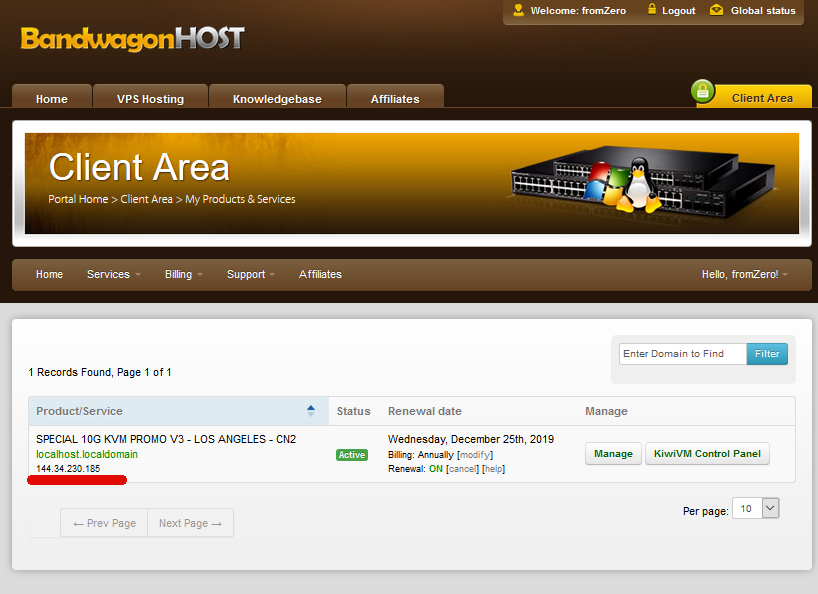
Next go to Step #3 by clicking "KiwiVM Control Panel" button. Aha, I see my IP address here as well.
Great! Now I make sure I change my KiwiVM Control Panel Password to the one I can remember before I Log off :)
You may want to set a KiwiVM password for convenience (so you can login to KiwiVM without first logging into Client Area), or to share KiwiVM login information with your colleagues without having to give them access to the entire Client Area.
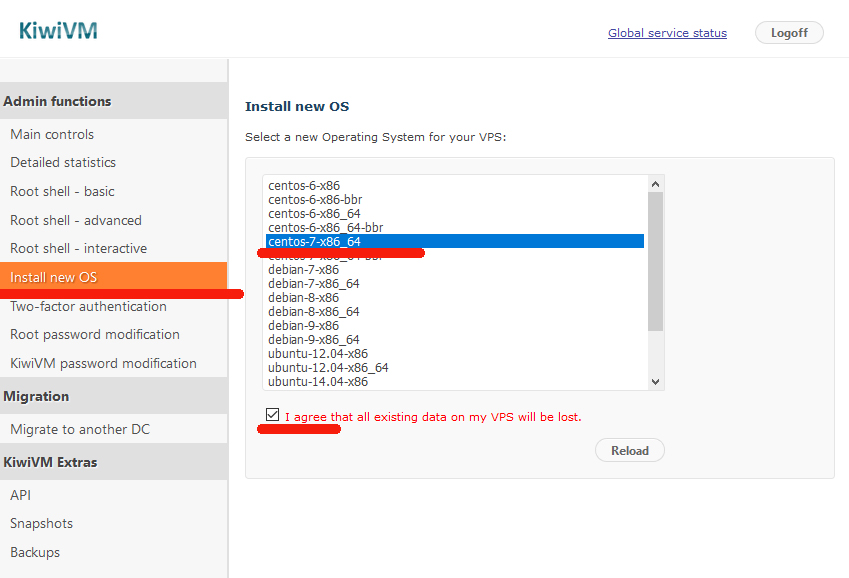
6. Install Centos 7
As a beginner, I'm Googling all my answers. I don't even know what Centos 7 is... laugh or cry... They say to install it to avoid future trouble with my website.
We prefer using CentOS for simple tasks such as website hosting due to the fact that updates to CentOS very rarely break things. In our experience you can set everything up on a CentOS machine and not touch anything literally for years (besides OS updates). This cannot be said about Ubuntu or Debian OS as these OS do not always update smoothly, and generally have shorter update cycles.
If you are an experienced Linux user, both Ubuntu and Debian can be a better choice, but be prepared to perform more maintenance tasks in general.
So, let's do it.
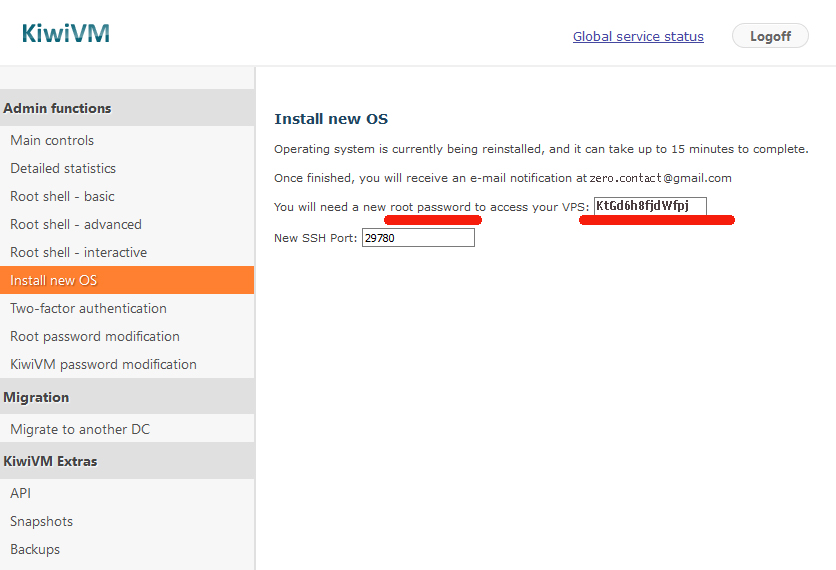
The system begins the installation. Make sure to save the Root Password shown.
Agggrrrr... It’s another password to have! Not sure about you, but I'm overwhelmed and confused enough.
To spare you frustration with passwords, here is the summary of all passwords you’ll need:
7. All Passwords you’ll need to Remember. There are 3 of them:
Password #1. Client area Log in and Password
Gets you into your Client Area, where you buy & renew all your VPS services:
 |
 |
It can be changed in the Client Area (under your profile).
Password #2. Control Panel Log in and Password
Gets you into your VPS Control Panel where you manage & "talk" to your VPS:
 |
It can be changed in the KiwiVM Control Panel (under "KiwiVM Password Modification").
Tip: Use auto-login from Client Area to access KiwiVM Control Panel (in the Client Area, Navigate to Services -> My services. Click "KiwiVM Control Panel" button).
Password #3. Root Shell Log in and Password
Gets the root access ("inside access") to your VPS where you talk to you VPS and execute Linux commands.
 |
 |
It can be changed in the KiwiVM Control Panel (under "Root Password Modification").
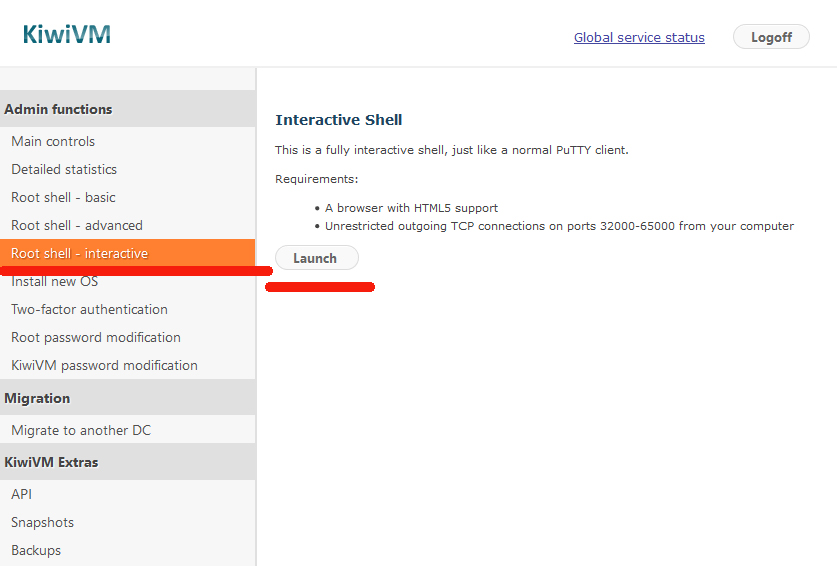
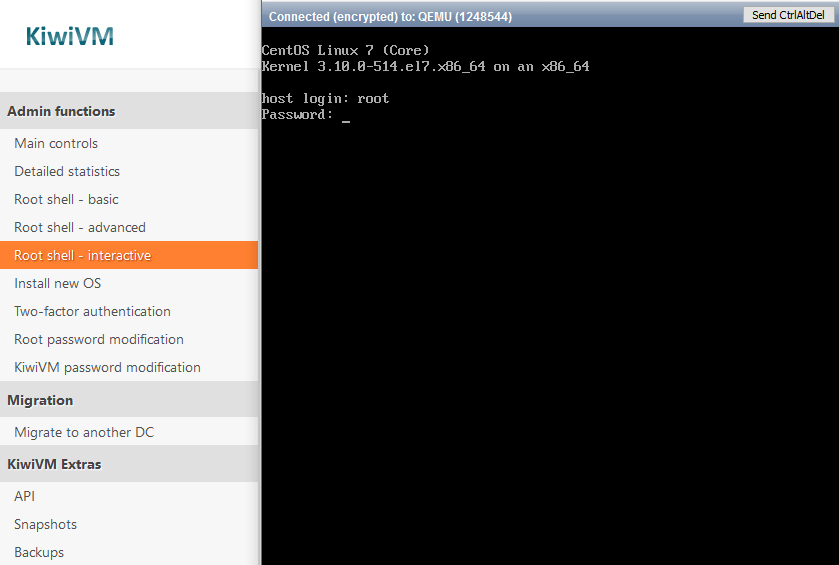
8. Talking to VPS via Root Shell Interactive. Log in.
Let the fun begin... Let me remind you it’s my very first VPS and Linux ever. Here we go. The Root Shell is the place where we will send all Linux commands. Root Shell Interactive greets us with the login line. How to log in?
Type in word: root and press [Enter]

Where to get password?

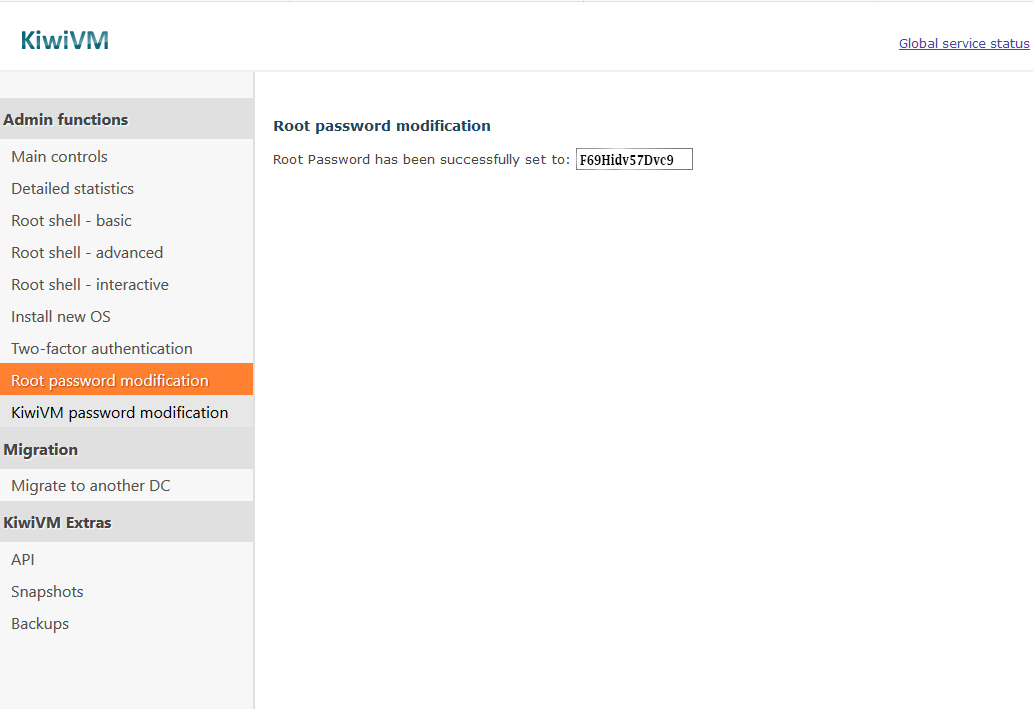
We saved it in Step 6. Otherwise you can always reset it again in KiwiVM Control Panel as follows:
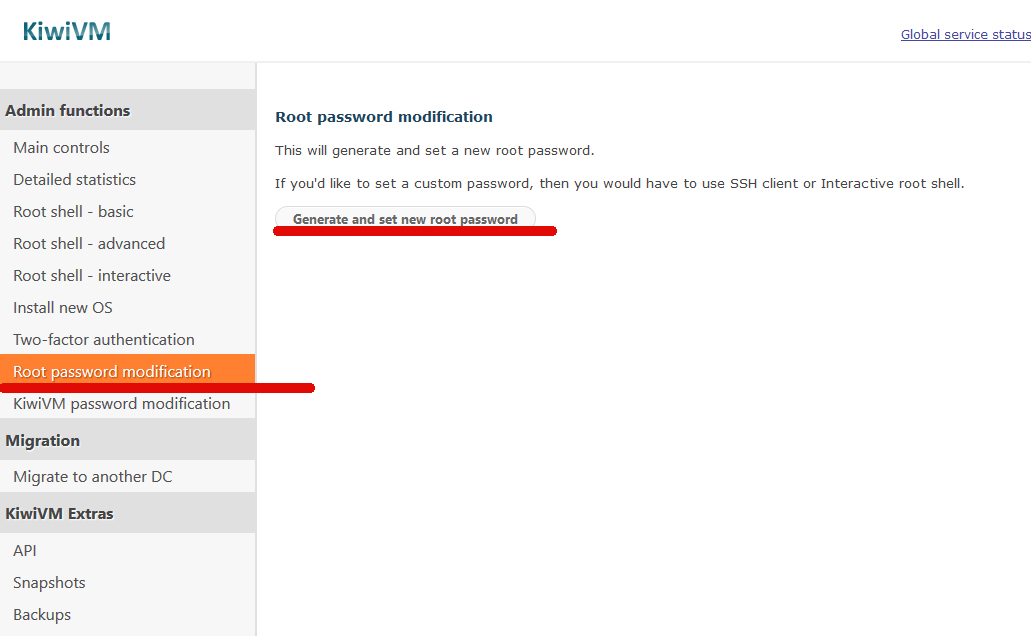
Here is the successful password modification result:
Now go ahead and type it in. Note, you cannot Copy & Paste anything in Linux... So the password is to be entered manually (make sure to respect the Upper case letters). In addition, as you type in the password, it won't be show on the screen, kind of blind typing.. Once finished, press [Enter]. So, after every command line, you press [Enter]. That's default rule to remember.
9. First Linux practice (can be skipped) - Change the root password in Linux
Remember that awkward root password we had to type in just now? Let’s change it to a better one.
Type in: passwd and press [Enter]

Now type in your new password (you won’t see the letters as you type). Press [Enter], then re-type it again as prompted. Press [Enter] again.

If successful, you should see the message: "passwd: all authentication tokens updates successfully."

Well done! You've just completed your first Linux task!
P.S. Root passwords generated by KiwiVM are relatively strong and are not saved in our system; if you do not absolutely have to change them, consider leaving them as is.
10. Linux System Update
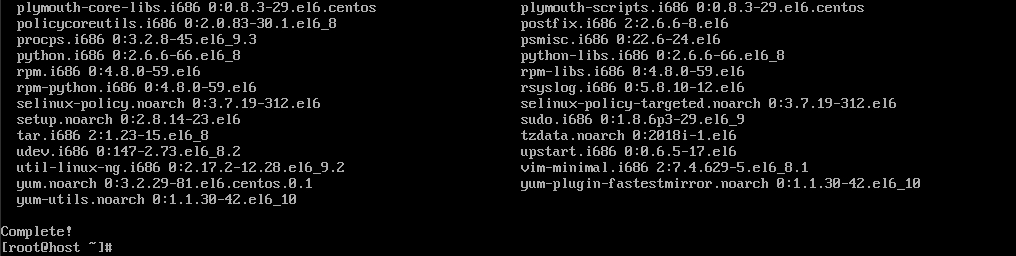
First thing first - update your system packages. Type in: yum update and press [Enter]

Wait and see lots of data rolling on the screen until you finally see message similar to this: "Total download size: 100M Is this ok [y/N]:"

Nice question, how can I tell? Hope it is ok :) Let’s agree, and say "Yes". Type in: y and press [Enter]. Here it started downloading packages... Caught the screen as follows:

And finally as it finishes updating you’ll see "Complete!"
Now reboot the system. Type reboot and press [Enter]

... now wait... (until prompted to log in), then login again.
11. Installing Apache, MySQL, PHP 7
Even though you might not know (just like me :) what they're for exactly, you need them all to be installed.
11.1. Install Apache and MySQL
Type in: yum install httpd mariadb mariadb-server


Alright, familiar prompt ending with "Is this ok [y/d/N]:" Type y and press [Enter]. See the message: "Complete!"
So far it's been fun! :) Now enable and start Apache: Type systemctl enable httpd

Type systemctl start httpd

If there is no error or messages given, then it's all good. Otherwise you’ll see an error message.
Now enable and start MySQL: Type systemctl enable mariadb

Type systemctl start mariadb

Again, if there is no error or messages given, then it's all good. Otherwise you’ll see an error message.
11.2. Install PHP 7
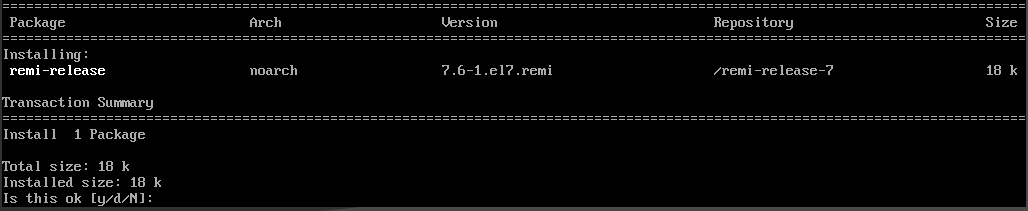
Type yum install https://rpms.remirepo.net/enterprise/remi-release-7.rpm

Receiving a familiar prompt. Press y and [Enter]
Type

Receiving a familiar prompt. Press y

Followed by another prompt. Press y

Receive message "Complete!" Type systemctl restart httpd

Done.
12. Set up MySQL
12.1. Important: Securing mysql
Has to be done to prevent hacking... in other words, so that it can only respond to my commands, and ignore the rest of the world.
Installing the editor to help us with this. Type yum install mc

Press y

Type mcedit /etc/my.cnf.d/myconfig.cnf
Note the Space symbol after mcedit, see my first attempt below resulting in error, followed by second correct one.

In the blue window we landed, type in
bind-address=127.0.0.1

Save this by pressing F2, then exit by pressing [Esc] two times
Type systemctl restart mariadb

Yay :) I'm so excited about my Linux achievements so far!
Furthermore, it may give you a false sense of security. Creating a MySQL user with a stong password is a generally good thing, but MySQL has many more attack points to consider.
From security standpoint, in a single-tenant application (single user on a VPS, single website etc) the only thing you need to do is prevent MySQL from speaking with entire Internet, which is achieved via the myconfig.cfg file above. Once this is done, most potential security issues related to MySQL become completely irrelevant.
See additional comment about MySQL user and password at the very bottom of the article.
12.2. Create Mysql database
Type mysql -e "create database yourdatabasenamehere"
(important: don’t forget the ""). My database name is called allbrokers.

Done. Congratulations to myself (and to you getting here)!
13. Check IPtables
Type iptables -L -n

Result: 
All good. Nothing extra needs to be done here. Your VPS is all set. This concludes work to be done in Linux Interactive panel.
Carefully designing firewall rules in a multi-tenant environment is important, however for novice users running a single-tenant environment there are very limited circumstances where configuring iptables may help (and not break anything).
If your VPS is hacked, no amount of firewall rules will prevent abuse. This is because once your VPS is infected, the malware has full control over entire OS, this includes firewall. We recommend focusing your efforts on other security aspects like updating your OS and website scripts on a regular basis, not using simple passwords, and not have software obtained from questionable sources running on your VPS.
Additionally, as mundane as this may sound, do keep your home PC fully updated and have an anti-virus software in place. We have seen countless cases of users unknowingly running malware on their PCs which would connect to your VPS and infect it without their knowledge. In our experience, following this advice alone would have prevented at least half of the security issues our customers face on a regular basis.
14. Point your website domain to your VPS
To do this, we need to create an "A record" for your website domain. This is done at the place where you registered your domain, e.g. with your domain registrar. (The "A record" will point your domain name to your IP address, e.g. tie them up together, so that when the domain name is being requested on the Internet, the name sever will know which IP address so send it to). I've registered my domain via Hover.com. Let’s go to their website.
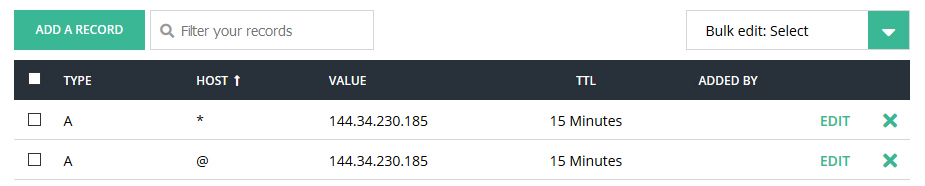
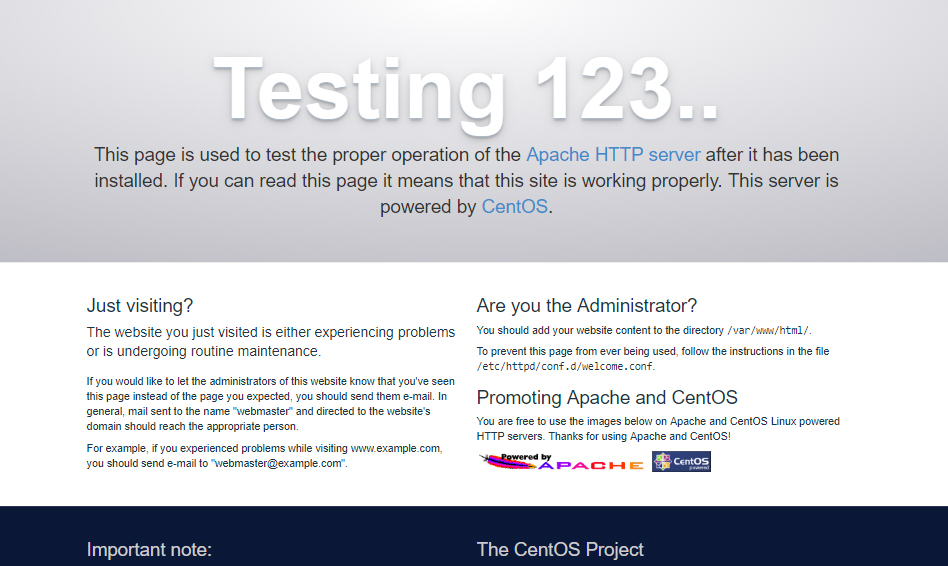
We change the field with * (common) And we change the field with @ (other registrars might have it left blank) In the IP field now add the IP if your VPS. Within the next 15 minutes (default TTL time set alongside your DNS record) go to your website in browser to see the Apache Welcome page. This means we have successfully created the "A record" and successfully installed Apache.
http://11.22.33.44/
And you will see the same content in the browser as if you were accessing your domain name.
15. Load your website files to your VPS
This must be the most exciting part. At last! The files are to be uploaded to public_html folder. How exactly to bring them there? By using file manager. I was suggested to try such software as: Far Manager (though not very popular), otherwise WinSCP (recommended), otherwise FileZilla.
Let’s google WinSCP. It leads us here: https://winscp.net/eng/index.php
I’m downloading it now. Now run the downloaded .exe file. Use all default presets and click Install.
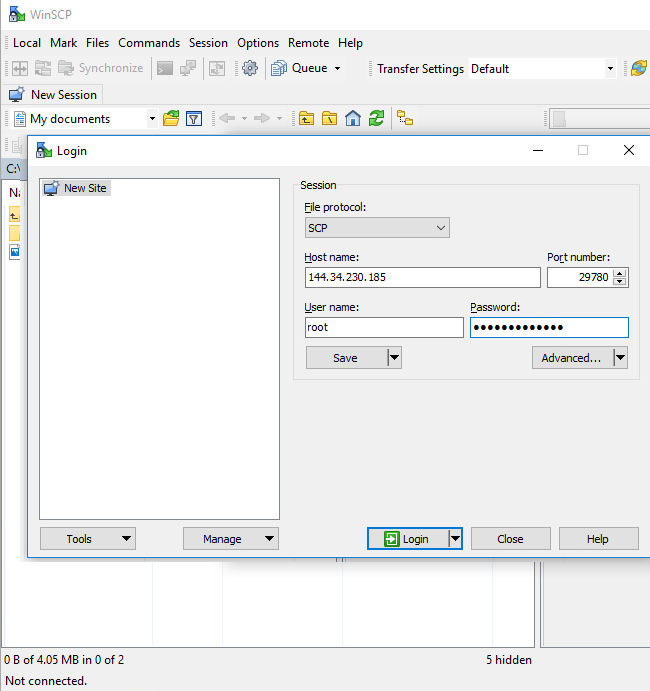
File protocol : SCP
Host name: IP address of your VPS
Port number: SSH Port found in Main Controls in KiwiVM (same page where the IP address is)
Username: root
Password: your Root Shell Password (Password #3 in my collection of passwords above).
Password, if forgotten, can be obtained via "Root Password Reset" in KiwiVM Control Panel.
Once you log in, you’ll be able to simply drag files from left window (your PC) to right window (your VPS).
It’s a GREAT SUCCESS! Congratulations to me and to everyone setting you first website on Linux VPS!
P.S. Have you uploaded your website to the "/root" folder? That’s what I initially did, of course. Newbie with the capital letter. The default starting place to upload your website files is: /var/www/html
To test that you entire vps setup works, create a simple file called index.html inside /var/www/html folder and write "IT WORKS!" inside the file and save it. Then visit www.yourwebsitenamehere.com/index.html you should see "IT WORKS!" and then you smile :)))
16. Setting up a .htaccess File
This step will be needed in order for your website to function properly, e.g. be able to write and re-write "things" as needed, instead of showing 404 errors.
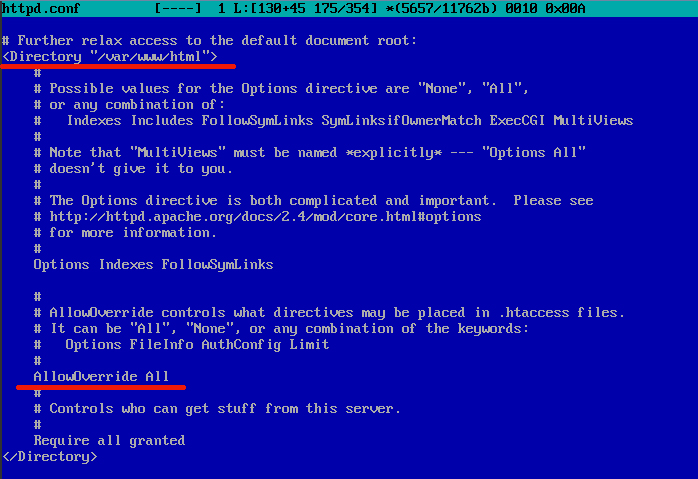
Type mcedit /etc/httpd/conf/httpd.conf
Scroll to find the section that reads <Directory /var/www/html>
Now in this section, after AllowOverride, replace the word None with the word All
Save this by pressing F2
Then exit by pressing [Esc] 2 times
Restart Apache to apply changes.
Type systemctl restart httpd
This should now make your website fully functional.
P.P.S if your script needs to write files to a specific folder, but can't access it for whatever reason (just like my Drupal now can't even begin installation, and is begging for writing access).
To fix this, type the following command (must be done after all your website files are uploaded to your VPS server):
Type chown -R apache: /var/www
Fixed.
Incredible! I've finally set up my own website on Linux VPS!
The Happy End.
VPS Features
All VPS come with the following:
- PPP and VPN support (tun/tap)
- Instant RDNS setup
- Full root access
- Powered by KiwiVM
Satisfaction Guarantee
Thinking about switching to us?
- Instant setup
- 99.9% uptime guarantee
- 30-day refund policy